Clay pumpkins give preschoolers a hands-on way to investigate shape, texture, and form—without requiring every creation to look alike. Build the experience into an intentional, flexible lesson with ChildCareEd’s Lesson Planning for Preschoolers  Buy Now $24.00, which helps providers plan developmentally appropriate activities; for a deeper look at child-led art, explore Open Heart, Open Art Buy Now $16.00. The ideas below offer a practical starting point for turning a simple seasonal invitation into rich three-dimensional learning.
Why invite children to sculpt a pumpkin from clay?
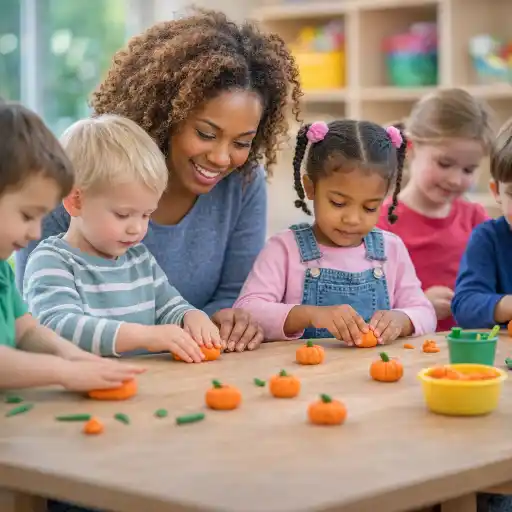
Rolling a ball of clay may look like a small activity, but it asks children to coordinate observation, movement, imagination, and decision-making. As they press and turn the clay, they explore how a soft, shapeless material can become a rounded object with a top, base, grooves, and perhaps a stem. This makes sculpture concrete: children can see and touch how their choices change a form in space.
The activity also supports several areas of learning at once. Squeezing, rolling, pinching, and pressing engage hand muscles and coordination. Comparing a real pumpkin with a clay model invites vocabulary such as round, curved, smooth, bumpy, larger, and smaller. Children may also count the grooves, compare sizes, describe a plan, or tell a story about what their sculpture represents.
Most of all, the experience can communicate that art is exploration, not a test of copying. When children are free to make a pumpkin, another autumn object, or something imaginary, they have meaningful choices and a reason to persist. The purpose is not a perfect display; it is the thinking and experimentation taking place as children shape their own ideas.
How can you prepare a safe and inviting clay station?
Keep the setup simple and within reach. Use child-safe, non-toxic clay appropriate for your group, and offer a stable tray, board, or washable work surface for each child or small group. Air-dry clay is one option when you want to keep the sculptures for a display; check the product instructions for handling and drying. If using natural materials, inspect them for sharp edges, dirt, or small parts, and supervise closely. Follow your program’s safety procedures and consider allergies, mouthing behaviors, and individual needs.
- Clay in manageable portions, plus a few extra pieces for children who want to revise.
- Boards or trays to protect surfaces and move sculptures while they dry.
- Short, blunt-ended tools or craft sticks for making grooves; avoid sharp tools.
- Optional natural items such as leaves or twigs, selected and checked for safety.
- A nearby handwashing and cleanup plan, with clear expectations for keeping clay off mouths and away from shared food areas.
Place a real pumpkin or a photograph nearby as an observation prompt, not as a model children must reproduce. You might say, “What do you notice about the lines on this pumpkin?” or “What could you use to make a stem?” Give children time to look and wonder before introducing any technique. A predictable setup and a few well-chosen materials help children focus and make the invitation approachable.
What steps help children make a three-dimensional pumpkin?
Begin by inviting children to handle the clay and notice how it responds. Demonstrate a small range of actions—rolling, pressing, turning, and pinching—while narrating your own thinking. Then allow children to take the lead. A possible sequence is:
- Offer a piece of clay and invite the child to roll it between their palms or on the work surface.
- Ask what might happen if they gently press the ball to make it slightly squat or flatten one side.
- Invite them to add lines or grooves by pressing a blunt tool or fingertip from top to bottom, turning the form as needed.
- Offer a small twig or a piece of clay for a stem only if suitable and safely managed.
- Let children add marks, textures, or other details that fit their ideas, then place the sculpture on its tray to dry according to the clay directions.
Keep directions brief and avoid correcting a child’s form into an adult version of a pumpkin. If a sculpture collapses or cracks, treat it as information: “It’s leaning. What could help it stand?” Children can adjust, rebuild, or decide that the changed form is what they want. This kind of flexible support builds agency while preserving the artistic challenge.
How can you make the experience child-led and inclusive?
Offer an invitation rather than a prescribed craft. A finished sample can unintentionally suggest that success means making an identical object. Instead, provide clay alongside a real pumpkin, leaves, bark, or safe tools and ask, “What could you make or discover with these?” Children may sculpt a pumpkin, a creature, food, or an abstract shape. Their different interpretations are evidence of engagement, not a departure from the lesson.
Adapt the materials and participation options to the children in your care. Some children may prefer softer modeling material, larger pieces, a textured tool, a visual example of the steps, or more time to explore before shaping. Others may benefit from working alongside a peer or having the clay secured on a nonslip tray. Offer choices without requiring every child to touch the material; children can observe, use a tool, describe what they notice, or contribute to a shared sculpture.
- Use open prompts: “What do you notice?” “How could you make that mark?” and “What might you try next?”
- Describe children’s strategies instead of judging appearance: “You turned it around to add lines on every side.”
- Allow children to choose whether they want to make a pumpkin or another idea.
- Support peer conversation and turn-taking while keeping enough materials available for independent work.
This responsive approach respects children’s strengths, cultures, sensory preferences, and developmental differences. A shared theme can create community without requiring uniform results.
How can you extend learning beyond the sculpture?
Use the clay work as a starting point for conversation and further exploration. Invite children to describe what they made, how it feels, and which decisions changed its shape. Introduce seasonal words naturally—pumpkin, stem, groove, round, smooth, press, and roll—and give children time to use them in their own explanations. If they are interested, compare sculptures by size, height, or number of grooves, or arrange them into a collaborative pumpkin patch.
Learning can continue after the clay is put away. Children might draw their sculpture, dictate a caption, retell how they made it, or use dried forms in a supervised small-world play area. Add real pumpkins for observation and compare the differences between a natural object and a model. These extensions connect expressive arts with language, early mathematics, observation, and imaginative play without turning the activity into a worksheet.
Document the process with short notes or photographs, following program privacy policies. Record children’s words and actions—such as “I made deep lines so it looks bumpy”—rather than assigning a skill based only on the finished object. Reflect afterward: Which materials encouraged exploration? Who needed a different way to participate? What question might extend the children’s interest tomorrow? A set of preschool lesson-planning strategies Buy Now $24.00 can help connect these observations to purposeful next steps.
What common pitfalls should educators avoid?
Seasonal art can become overly adult-directed when every child is expected to follow identical steps or produce a matching display. A brief demonstration is useful, but avoid presenting a “perfect” sample as the target. Children’s sculptures may be lopsided, abstract, or unexpectedly inventive; that variety is part of three-dimensional exploration. Focus attention on what children try, notice, and decide.
Another pitfall is setting out too many materials or tools at once. A crowded table can distract children and make supervision harder. Start with clay and one or two optional tools, then add materials in response to interest. Avoid small or sharp loose parts that could present hazards, and use products as directed. Check that each child can reach and use the materials comfortably, and plan for cleanup and drying before beginning.
- 🎃 Keep the goal focused on exploring form, not producing identical pumpkins.
- Use prompts that invite thinking instead of giving every step as a command.
- Observe and supervise throughout, especially when natural objects or tools are available.
- Offer support without taking over the child’s work or “fixing” an unconventional sculpture.
- Check relevant program policies and material instructions; state requirements vary - check your state licensing agency.
When plans stay simple, safe, and flexible, educators can attend to children’s ideas rather than managing a complicated craft. A successful activity is one in which children have room to explore and every child has a meaningful way to take part.
Conclusion: What does a clay pumpkin teach about three-dimensional art?
Rolling a pumpkin from clay helps preschoolers experience sculpture as something they can shape, turn, feel, and revise. With a safe, inviting setup and open-ended guidance, children explore form and texture while practicing coordination, language, comparison, and creative problem-solving. The value lies in the making—not in whether every pumpkin looks the same.
For providers, the practical takeaway is to start with a clear learning intention, a few accessible materials, and questions that keep children’s thinking at the center. Notice their strategies, adapt the invitation to support participation, and use children’s observations to plan what comes next. That is how a simple autumn art moment can become a thoughtful learning experience.
Explore these English-language ChildCareEd courses for related professional learning:
- Lesson Planning for Preschoolers Buy Now $24.00
- Open Heart, Open Art Buy Now $16.00
- Art from the Heart for Preschoolers: Open Ended Art Projects that Build Self-Esteem Buy Now $35.00
- Children at the Wheel: Emergent Curriculum Buy Now $25.00
- DAP for Preschool Buy Now $24.00
References
- EYFS Autumn Art – Easy Clay Pumpkin Activity
- Early Childhood Clay Curriculum (Pre-K)
- 3D Art Activities for Preschool, Pre-k, & Kindergarten
- Clay Play 101: A Beginner's Guide to Introducing Clay to Preschoolers
- 19 Fall Process Art Activities for Preschool, Pre-K, and Kindergarten
- Creative 3D Art for Kids
- Clay Modelling Activities That Inspire Preschool Children
- 10 Open-Ended Preschool Art Activities to Spark Creativity
- Preschool Pumpkin Lesson Planning Ideas
- The Complete Guide to Preschool Lesson Plans
- How Do You Create Effective Lesson Plans for Preschoolers?
- Lesson Planning for Preschoolers – ChildCareEd course Buy Now $24.00
- Meaningful Lesson Planning for Infants/Toddlers Buy Now $24.00
- Ways to Explore Pumpkins Through Play: Art, STEM, Sensory & More
- Preschool Fall Activities: 38 Hands-On Ideas for Autumn
- 3D Art and Sculpture for Kids: 11 Easy Creative Projects
- How Young Children Use Clay with Natural Loose Parts Materials
- Process Art Activities for Preschoolers: Open-Ended Ideas for Ages 3–5
- 10 Amazing Autumn Crafts for Preschoolers
- 30 Fall Art Activities for Preschoolers That Are Hands-On and Colorful
- 45 Hour Child Growth and Development
- What Makes Me Special: An Overview of Autism and ADHD
- Birth to Five CDA Credential with Portfolio Review
- CDA Bridge Bundle: Preschool
- Pediatric RSV First Aid & CPR/AED
- CDA Bridge Bundle: Family Child Care without Portfolio Review
- Art from the Heart for Preschoolers: Open Ended Art Projects that Build Self-Esteem
- CDA Bridge Bundle: Infant/Toddler without Portfolio Review
- CDA Bridge Bundle: Preschool without Portfolio Review
- CDA Certification en Español: Recursos y Consejos para Educadores Bilingües
- 🥦✨ ¿Cómo apoyar a los niños selectivos a probar nuevos alimentos sin presión?
- Apoyo en Español para Capacitaciones Grupales Presenciales y por Zoom en Cursos Selectos
- 10 Ejemplos de Cómo la Cultura Influye en el Desarrollo Infantil
- Proporciones de Cuidado Infantil y Tamaños de Grupo por Edad en Maryland (Guía Rápida para Centros y Hogares)
- Actividades de Otoño Fáciles para Preescolares esta Temporada
- Cómo Trabajar en el Cuidado Infantil en Carolina del Norte: Requisitos y Pasos
- Calabazas, hojas y manzanas: actividades de otoño para preescolares
- Celebrando la amistad en el cuidado infantil durante el Día de los Mejores Amigos
- Canciones, juegos y preguntas de círculo para niños
- How Can Early Childhood Programs Support Creativity Through Process Art?
- Open-Ended Art Activities for Preschoolers: 15 “What Can You Make?” Invitations
- Should I Teach My Blind Child Colors? Why Do Color Words Still Matter?
- How Can Halloween Fine-Motor Activities Be Fun Without Being Scary?
- How Can Creative Art Support Early Fine Motor Development?
- How Can Child Care Providers Bring Autumn Indoors Through Texture Hunts and Open-Ended Art?
- How Can Fall Art Leave Room for Children’s Ideas Beyond Matching Pumpkins?
- How Can Teachers Encourage Children to Use Materials Creatively Instead of Only One Way?
- How Can a Rolling Pumpkin Turn a Toddler’s Idea Into Meaningful Play?
- How Can Rolling a Pumpkin from Clay Help Preschoolers Explore Three-Dimensional Art?
