What is scratch art and why use it in a childcare setting?
Scratch art is a simple process-art technique in which children draw with wax crayons beneath a painted surface and then scratch away a top layer to reveal bright marks and textures. It is low-cost, open-ended, and adaptable for infants, toddlers, preschoolers, and mixed-age groups. This page includes step-by-step facilitation tips, adaptations for varying abilities, and ideas to extend the experience into literacy or social-emotional work.
If you want deeper professional development on using art for social-emotional growth and process-based approaches, consider ChildCareEd courses such as Open Heart, Open Art  Buy Now $16.00 and Art from the Heart for Preschoolers Buy Now $35.00. These trainings discuss open-ended art, guidance strategies, and how to structure art experiences that build self-esteem and positive behavior.
Also see our short social post with a demo on Instagram for a quick visual example.
What supplies and preparation do I need?
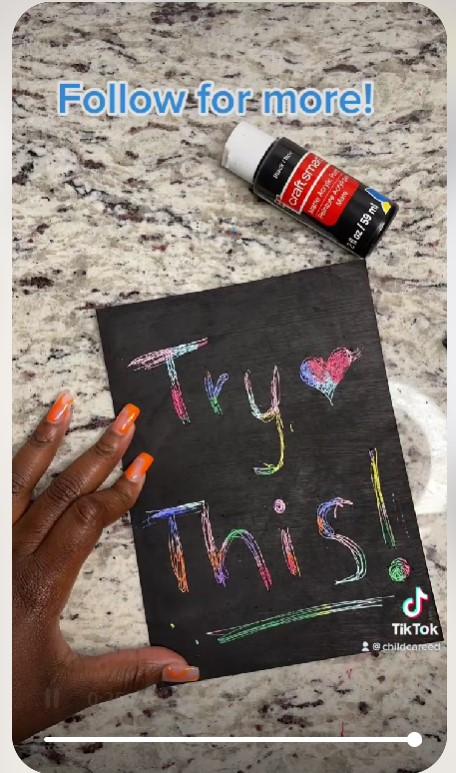 The basic materials are intentionally simple and accessible. Prepare work surfaces, smocks, and a drying area before you begin. Ensure paint is non-toxic and that you have enough crayons so each child can make a fully colored base layer.
- Acrylic black paint (or tempera mixed with a bit of dish soap for easier removal)
- White drawing paper or heavy-weight cardstock
- Crayons in a range of colors (encourage full coverage)
- Toothpicks, wooden dowels, or safe scratching styluses (rounded tips for younger children)
- Optional: shallow trays, paper towels, smocks, washable table coverings
Preparation and safety notes: set up trays or a designated drying rack, pre-cover the table for easy cleanup, and pre-assign tools for very young children to limit sharing. Keep toothpicks or styluses in a supervised container and model safe use; for infants and some toddlers, substitute blunt-ended sticks or facilitate a teacher-led scratch demonstration to avoid choking risks.
How do I lead a scratch art activity step-by-step?
Plan for a 25–40 minute session depending on age and pacing. Use these steps as a facilitation script you can adapt to each group’s needs.
- Invite children to cover the paper completely with crayon marks; encourage layering, pressure variation, and color exploration. (This stage practices color recognition and fine-motor control.)
- Let the crayon layer rest briefly. While children work, thin a coat of black acrylic paint and apply it evenly over the crayon layer; for large groups, teachers can pre-paint sheets and let them dry before the session.
- Once the paint is dry to the touch, demonstrate scratching techniques on a sample: simple lines, dots, cross-hatching, and silhouette shapes. Remind children to scratch gently so the paper does not tear.
- Children use toothpicks or styluses to reveal the colors below. Circulate, show examples, and ask open-ended questions to extend thinking (e.g., "What happens when you press harder?" or "Can you make a pattern?").
- Conclude with a sharing moment: invite children to describe textures, colors, or a story about their picture. Display finished work on a drying rack or wall gallery.
How does scratch art support development and how can I adapt it?
Scratch art is a strong process-art experience: it emphasizes exploration over product and supports multiple domains of development. It builds fine-motor strength and bilateral coordination, practices planning and patience, and offers language opportunities when children describe colors, patterns, and choices.
Adaptations by age and ability:
- Infants/toddlers: teacher-led demonstration, larger implements with blunt ends, and adult-made painted sheets where children point and describe marks.
- Preschoolers: independent crayon layers and guided scratch time with scaffolded prompts to try shapes or themes.
- Children with motor challenges: use larger styluses or craft sticks, provide hand-over-hand support, or create larger format papers to reduce precision demand.
- To integrate IEP goals or social-emotional goals: pair the activity with turn-taking, descriptive vocabulary, or emotion-themed prompts.
If you need explicit supervision strategies during messy or concentrated activities, consider the ChildCareEd course Active Supervision: A Strategy That Works Buy Now $35.00 to review circulation, positioning, and prevention tactics.
What are extension ideas, further reading, and classroom connections?
Use scratch art to bridge into literacy (children write a caption), science (discuss color mixing and resist), or social studies (create community scenes). For infants and toddlers, the Playful Learning: Infant & Toddler Activities Buy Now $25.00 course offers age-appropriate sequencing ideas to align this project for younger learners.
- Related ChildCareEd articles: Crayon Activities for Preschoolers, Can Doodling and Drawing Build Fine Motor Skills?, Unlocking Creativity and Fine Motor Skills with DIY Scratch Art, Crayon Activities That Support Toddler Development, Summer Crafts and Activities for Preschool Classrooms, and Mother’s Day Gifts and Crafts Children Can Make.
How can I use scratch art to plan meaningful art time?
Wrap the activity with reflective documentation: photograph works in progress, write a short anecdotal note about the child’s choices, and share one strategy with a colleague at the next team meeting. Process-focused art activities like scratch art support #creativity, strengthen #finemotor, and open avenues for #language, #selfexpression, and #inclusion. They are inclusive and adaptable — ideal for centers seeking low-cost, high-impact art experiences.
Further supports and professional development are available through ChildCareEd courses referenced above and in the links. Consider embedding this activity into a weekly arts rotation or an individual learning objective for children who need fine-motor practice.
How can I assess learning and document progress with scratch art?
Use scratch art as an observational probe that yields evidence across cognitive, motor, and language domains. Before the activity, identify 2–3 targeted objectives (for example: improved bilateral coordination, increased color vocabulary, or turn-taking). During the session, collect brief anecdotal notes and one or two photographs of works in progress; avoid interrupting the process but record the child’s intent, strategies, or comments verbatim when possible. Documentation should be linked to measurable behaviors so it can inform individual plans or coaching conversations.
- Sample observation checklist: 1) grasp and tool control (holds stylus appropriately), 2) visual scanning and planning (uses space to arrange marks), 3) language (names colors or describes pattern), 4) social skills (waits turn, shares materials).
- Use short, timed observations (3–5 minutes) for each child and enter notes into the program’s documentation system or the child’s portfolio.
- Align notes to IEP or developmental goals by extracting one observable skill to target in a subsequent session and share the observation with families in a concise anecdotal form.
What are the key takeaways for using scratch art in my program?
Scratch art is a low-cost, adaptable process-art technique that supports fine-motor development, planning, and expressive language when facilitated intentionally. Prepare materials and supervision strategies that match children’s ages and motor needs, scaffold participation for children with challenges, and use brief, objective documentation to capture progress. Embedding scratch art in weekly rotations or individualized objectives creates repeated practice opportunities and helps integrate art into literacy, science, and social-emotional learning. Share outcomes with families and colleagues to reinforce learning and inform next steps.
In summary: plan materials and supervision intentionally, scaffold participation for differing abilities, document observable skills, and repeat this process-art activity to support fine-motor development, inclusion, and family engagement.
- CDA Home Visitor Subject Area 3 Part 3 Birth to 5
- Many Colors, One Canvas: MD ECE Conference
- CDA Home Visitor Subject Area 2 Part 3 Birth to 5
- Professional Presence in Early Childhood
- Open Heart, Open Art
- Power of Art: Bldg Self-Esteem & Positive Behavior for ALL Abilities
- Open Ears: Listening in Child Care
- Art from the Heart for Preschoolers: Open Ended Art Projects that Build Self-Esteem
- Texas Director Credential
- Supporting Families and Caregivers in Language and Literacy
- Juneteenth History and Activities
- Thanksgiving Booklet Activity
- Unlocking Creativity and Fine Motor Skills with DIY Scratch Art
- Apoyo en Español para Capacitaciones Grupales Presenciales y por Zoom en Cursos Selectos
- ¿Cómo puedo enseñar habilidades de primeros auxilios con escenarios de juego de roles?
- ¿Cómo afecta la dopamina a los niños: señales, efectos e influencias diarias?
- Actividades de Motricidad Gruesa que Desarrollan el Equilibrio, la Coordinación y la Fuerza
- Las Mejores Ideas de Excursiones para Guarderías en Dakota del Norte
- How Do Art Activities Support Cognitive Growth in North Dakota Preschoolers?
- How Do Art Activities Support Cognitive Growth in North Dakota Preschoolers?
- How can New York child care providers use art and creativity to help young children learn?
- Crayon Activities for Preschoolers: Color, Creativity, and Fine Motor Skills
- School-Age Lesson Plans for After-School Child Care
- Crayon Activities That Support Toddler Development
- Fun Crayon Activities for Toddlers and Preschoolers
- How can North Dakota fill the gap for school-age children before and after school?
- How can school-age daycare use outdoor activities to teach, play, and stay safe?
- Can doodling and drawing build fine motor skills and creativity?
- What Are 7 Printable Tools That Save Child Care Teachers Time?
- How Can Child Care Providers Keep Indoor Play Manageable When Rain Lasts All Week?
