A bridge that dips under a toy car gives children a visible puzzle: where did the structure first yield, and what might make it stronger? Use this simple test to build observation, early engineering language, and thoughtful redesign; Building Early Science Foundations  Buy Now $16.00 offers additional guidance on nurturing young children’s curiosity and inquiry through play. Read on for a practical, adaptable investigation—and explore the course if you would like a more complete foundation for planning early science experiences.
Why does noticing the first bend matter?
When children watch a bridge bend, they see that a structure can change before it collapses. That first small sag is meaningful evidence: perhaps the middle of the span is unsupported, a joint is loose, or the material is too flexible for the load. Learning to notice and describe that change turns a dramatic “It fell!” into a closer investigation of cause and effect.
Early engineering is not about expecting preschoolers to master formal physics. It is about helping them identify a problem, make a plan, build, test, observe, and revise. The process described in NAEYC’s discussion of the preschool engineering design process supports children in trying ideas and improving models with educator guidance. A bridge test offers an accessible setting for this cycle because the result can be seen immediately.
This work also supports #observation, language, cooperation, and early math. Children can compare where two bridges bend, count how many blocks each holds, or explain which feature they changed. Most importantly, their ideas are treated as worthy of investigation. The leaf bridge challenge similarly frames redesign as a useful part of learning, not a sign that a child has failed.
What materials and challenge make the test manageable?
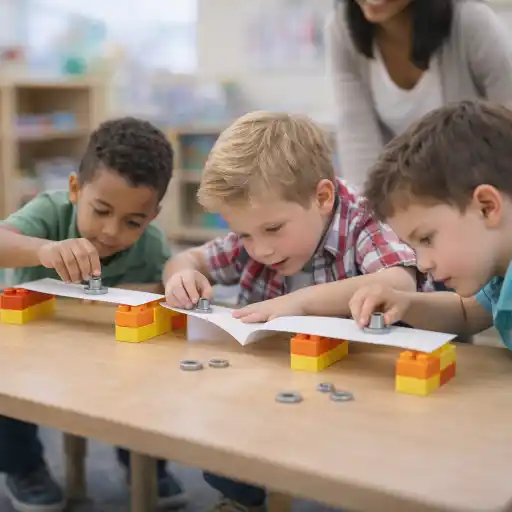
Keep the setup simple, consistent, and appropriate for the children’s age. Place two sturdy supports the same distance apart, then lay a bridge deck across them. Use familiar materials such as stiff paper, craft sticks, cardboard strips, or blocks. For testing, choose one lightweight toy or a few large blocks that adults can add slowly. Avoid small items that could pose a choking hazard.
Start with a clear, open-ended question: “Where do you think our bridge might bend when the toy crosses?” Invite predictions before the test. Children can point, draw a mark on a picture, or describe their ideas aloud. Explain that the “span” is the open distance between the supports, and that the “load” is the object placed on the bridge. Use vocabulary naturally as children build and test.
- Two stable blocks or boxes to serve as supports
- One or two bridge-deck materials to compare
- A lightweight toy or large blocks as the test load
- Paper and crayons, or a simple Bridge Testing Observation Journal, to record predictions and results
Keep the span, load, and testing steps the same when comparing designs. The Resources for Early Learning bridge activity also recommends using pairs of supports, a bridge surface, and a toy vehicle to make the engineering problem concrete. A predictable setup helps children focus on what changes rather than guessing whether the test itself changed.
How can educators help children locate the first weak spot?
Invite children to watch closely as the load is added slowly, one item at a time. Pause after each addition so they can notice movement. Ask, “Which part moved first?” “Did the middle dip, or did one end slide?” and “What do you see changing?” Avoid rushing to name the cause. Children may show their answer with a gesture or by pointing to the structure; these are valuable observations, too.
Use neutral language. If the bridge bends, say, “I see the middle is lower now,” rather than “That bridge is bad.” Distinguish what children saw from what they think caused it: “We noticed the deck sagged. What might have made that happen?” This makes room for several plausible ideas and supports evidence-based reasoning.
Document the test while it is fresh. A child can draw the bridge and circle the first area that moved. An adult can add the child’s words, take a photo, or mark a simple result chart. The ChildCareEd overview of simple STEM activities recommends brief documentation such as a photo and a short observation to support reflection and future planning.
- 🧩 Offer different ways to respond: speaking, pointing, drawing, demonstrating, or using a home language.
- Give children enough wait time to look before asking a follow-up.
- Record the first visible change, not only whether the bridge ultimately held.
What does the location of the bend suggest?
The first bend is a clue, not a complete diagnosis. If the deck sags near the middle, children might consider whether the span is too long or the center needs support. If one end slips, they can investigate how the bridge rests on its supports. If a connection separates, they can look at how the pieces were joined. These are age-appropriate observations about structure and stability, not a requirement to teach technical engineering terms.
Use simple comparisons to help children reason. Test a flat paper strip and then a folded one over the same gap with the same load. Ask what changed and whether the bend began in the same place. The Science Buddies paper bridge activity explains how folding changes paper’s cross-sectional shape and can make it harder to bend. With young children, demonstrate the difference and let their observations lead the conversation.
Change one feature at a time so the comparison stays understandable: add a support under the center, shorten the span, or change the deck material. Then repeat the test with the same load. Children can compare whether the bend starts later, appears in another place, or is less noticeable. The goal is to connect a design change with what they observe—not to find one universal “strongest” bridge.
How can children redesign and test fairly?
After the first trial, give children a chance to propose a change. Ask, “What could we adjust so the bridge bends less?” or “What could hold up this part?” Let children choose among a few safe materials or suggest their own idea. Their drawing, arrangement of pieces, or spoken explanation can serve as a plan; it need not look like an adult blueprint.
For a fair comparison, keep most conditions constant. Use the same distance between supports and add the same test items in the same way. Change one design feature at a time. If several features change at once, it is harder for children to tell which change may have influenced the result. Testing repeatedly is useful; it lets children see whether a result happens again and gives them a reason to refine their prediction.
Capture each round in a journal or class chart with a few simple fields: design, prediction, first sign of bending, and what changed next. Celebrate thoughtful observations and revisions, even when a redesign still bends. The NAEYC article on tinkering, making, and engineering emphasizes the value of the process—planning, testing, collaboration, and improving ideas—rather than focusing only on a finished product.
How can providers keep the investigation safe and inclusive?
Prepare materials before children arrive and check them for sharp edges, splinters, loose parts, or other hazards. Choose large, lightweight test objects and add them under close adult supervision. Keep the bridge low over a stable surface so a shifting structure cannot fall far. If scissors or adhesives are used, select age-appropriate options and supervise their use. State requirements vary - check your state licensing agency.
Plan more than one way to take part. A child might choose the materials, steady a support, place the test object with help, watch for movement, photograph the test, or dictate a journal note. Pair spoken directions with pictures or gestures, accept communication in home languages, and offer adaptations such as larger pieces or a shorter span when needed. Participation does not require every child to build in the same way.
Common pitfalls are easy to avoid: demonstrating one “right” design before children explore, adding multiple changes between tests, or calling a bend a failure. Instead, describe what happened, invite children’s explanations, and treat the result as information for the next trial. For more professional learning about play-based science and developmentally appropriate inquiry, consider Basic Science in Early Childhood Buy Now $25.00, Enhancing STEM Education for Infants and Toddlers Buy Now $16.00, or Tomorrow’s Einsteins: Infant and Toddler Science Buy Now $16.00. Check with your program or licensing agency about whether a course meets a particular training-hour need.
Conclusion: Where does a bridge bend first, and what can children learn?
A bridge often begins to bend where its material or support is under the greatest strain, but the most useful classroom answer comes from careful observation of the particular model. Invite children to notice the first change, describe its location, and consider what might have contributed to it. Then offer a chance to adjust one feature and test again under consistent conditions.
Keep the experience safe, inclusive, and playful. Use open questions, accept multiple ways of communicating, and document children’s predictions and discoveries in a journal or chart. A bend is not simply a problem to fix; it is evidence children can use to think like designers. With repeated opportunities to observe and revise, young learners can build confidence as curious, capable problem-solvers.
Suggested course links: Building Early Science Foundations Buy Now $16.00; Basic Science in Early Childhood Buy Now $25.00; Enhancing STEM Education for Infants and Toddlers Buy Now $16.00; Tomorrow’s Einsteins: Infant and Toddler Science Buy Now $16.00; CDA Subject Area 2 Buy Now $80.00.
- CDA Home Visitor Subject Area 3 Part 3 Birth to 5
- CDA Bridge Bundle: Preschool
- Pediatric RSV First Aid & CPR/AED
- CDA Bridge Bundle: Family Child Care
- CDA Bridge Bundle: Family Child Care without Portfolio Review
- CDA Bridge Bundle: Infant/Toddler without Portfolio Review
- CDA Bridge Bundle: Preschool without Portfolio Review
- CDA Bridge Bundle: Infant/Toddler
- Staff Supervision, Observation & Feedback
- Texas Director Credential
- CDA Certification en Español: Recursos y Consejos para Educadores Bilingües
- 💛🧩 ¿Cómo puedo hacer que mi enseñanza sea inclusiva para los niños con autismo?
- Cómo Abrir Una Quardería En Casa Sin Dinero?
- Cómo usar tu certificación de 90 horas en Maryland para completar tu CDA
- ¿Cómo pueden los equipos de cuidado infantil practicar habilidades rápidas de primeros auxilios en situaciones reales?
- Regulaciones de Licenciamiento de Cuidado Infantil en California para Centros y Hogares de Cuidado Infantil Familiar
- Proporciones de Cuidado Infantil y Tamaños de Grupo por Edad en Maryland (Guía Rápida para Centros y Hogares)
- Proporciones de Cuidado Infantil y Tamaños de Grupo por Edad en Nueva Jersey (Guía Rápida para Centros y Hogares)
- Proporciones de Cuidado Infantil y Tamaños de Grupo por Edad en Virginia (Guía Rápida para Centros y Hogares)
- Lista para Abrir una Guardería en Casa en Virginia: Cómo Empezar
- Lista para Guardería en Casa en Illinois: Cómo Iniciar una Guardería en el Hogar
- Lista para Guardería en Casa en Texas: Cómo Iniciar una Guardería en el Hogar
- Consejos de Supervisión Activa para Salones de Preescolar y el Juego al Aire Libre
- Cómo Trabajar en el Cuidado Infantil en California: Requisitos y Pasos
- Cómo Ser Maestra de Preescolar en Maryland
- Capacitación Previa al Servicio para Proveedores de Cuidado Infantil en Nevada
- Capacitación CDA gratuita en Illinois
- Canciones, juegos y preguntas de círculo para niños
- Cómo simplificar la capacitación para sus empleados de daycare
- Where Does a Bridge Bend First—and How Can Children Spot Structural Weaknesses?
