Transforming a compact outdoor area into a purposeful learning space is both practical and powerful. With intentional zoning, rotating materials, and an emphasis on natural elements, small playgrounds become places for discovery, movement, and relationship-building. In this article you’ll find concrete, low-cost ideas, safety checklists, and staff/family strategies grounded in early childhood practice and research. Many examples draw on ChildCareEd resources such as Outdoor play ideas for small spaces and training like Creating the Natural Outdoor Classroom  Buy Now $16.00. Practical note: state requirements vary - check your state licensing agency.
Quick snapshot: design using 1) clear micro-zones, 2) #naturalplay materials and #looseparts, 3) portable planters and balance elements, 4) low-mess #sensory stations, and 5) routine safety checks. Pick 2–3 changes to try this week and rotate after one month to keep interest high.
Why does turning a small outdoor area into a nature-rich classroom matter?
2) Practical gains for small programs:
- 🔸 Motor development and risk management: small stumps, logs and low climbing elements invite graded challenge. (See natural playspace examples at Winnie Palmer Nature Reserve.)
- 🔸 Curiosity and cognitive growth: loose parts and rotating invitations foster problem-solving and sustained attention (Loose Parts theory).
- 🔸 Social and emotional benefits: nature play reduces stress and supports self-regulation (research summaries in Grow Bloom & Thrive).
Why it matters: small outdoor zones are scalable and equitable—every child deserves daily contact with natural elements even when space is limited. Investing in micro-designs produces big returns in engagement, behavior, and family satisfaction.
How can you design compact, inviting #outdoorclassroom zones using natural materials?
- 📌 Map your footprint: measure the area and sketch 3–5 flexible zones (e.g., movement, messy, quiet table, planting). Keep paths clear and aim for visual buffers rather than permanent fences; see small-space tips at ChildCareEd: Outdoor play ideas for small spaces.
- 📐 Prioritize vertical and portable: wall planters, hanging ribbons, and rolling planter tubs save ground space (examples in the compact solutions list from TTS Group).
- 🌿 Use loose parts and natural anchors: logs, stumps, rocks, baskets of sticks, and a bin of shells or pine cones support open-ended play—read about loose parts benefits at Backwoods Mama.
- 🔁 Plan for rotation: pick 2 core invitations per week and rotate a loose-parts bin, a sensory sink, or a mini-garden to maintain novelty.
- 🪑 Define small workstations: tape squares or small bench markers give each child an art or sensory spot; it reduces crowding and increases ownership.
Design tip: lean on simple signage and picture prompts so children know how to use each station. For inspiration and plant/bed solutions see compact garden and planter ideas.
What natural materials and low-cost features most engage children in small spaces?
- 🌱 Mobile planters and wallhugger planters (1–2 pots per group) — easy to move and great for #gardening and observation (TTS ideas).
- 🪵 Balance stumps and small logs — natural gross-motor challenges; source reclaimed wood or stump slices from local tree services (Ind. Children & Nature).
- 🥣 Mud kitchen or potion table — compact mud kitchens spark sensory and STEM play; see mud-kitchen tips at TTS Mud Kitchen.
- 💧 Mobile water wall or sensory bin — a wheeled water wall conserves space and supports experiments (see mobile water wall options in the TTS list).
- 🐞 Bug hotel, bird feeder, and small binocular stations — invite observation and science talk; check the bug hotel and bird-feeder examples at TTS and Winnie Palmer.
- 🧺 Loose-parts crates: sticks, stones, fabric scraps, scoops, shells — keep these in labeled baskets so they’re ready and tidy (Loose Parts).
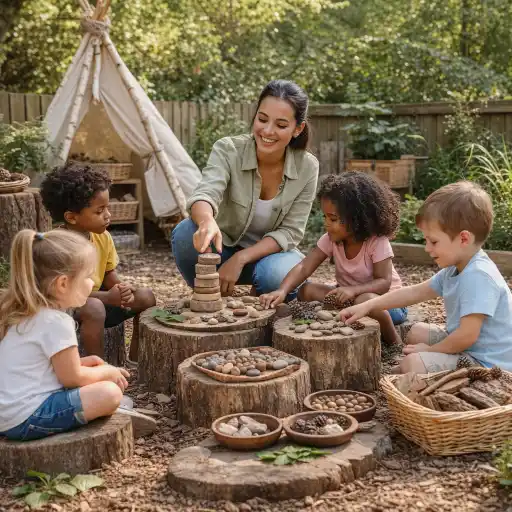
- 🎨 Chalk squares, tape markers, and a clipboard station for observation journaling — low-cost, high-impact.
Space-saving procurement: shop thrift stores for containers and trays, ask families for donations, and consider building items with a volunteer or Eagle Scout project (many nature playspaces began this way; see project ideas at WPNR).
How do we keep children safe, accessible, and developmentally challenged in a small natural play area?
Follow a short daily safety routine and accessibility checklist (numbered):
- 🔎 Daily hazard scan (1–3 minutes): check for glass, animal waste, exposed nails, and tripping hazards. ChildCareEd offers hazard-check guidance in Outdoor Play Areas.
- 🌤 Weather and air-quality check: use a simple traffic-light plan (go / shorten / stay inside). For health guidance see the CDC’s outdoor play and safety page: CDC Outdoor Play & Safety.
- ♿ Accessibility and inclusion: ensure at least one accessible route, consider wide board paths or firm surfacing, and adapt invitations (tactile trays, sound-based scavenger hunts). Refer to ADA design principles (ADAAG).
- ⛑ Supervision plan: assign staff zones, keep ratios reasonable, and rotate staff so active supervision remains dynamic.
- 📋 Documentation: record daily checks, incidents, and maintenance tasks to satisfy licensing and improve practice.
Common mistakes and how to avoid them:
- ❌ Overloading the space with too many toys — ✅ Solution: rotate and limit out to 2–3 invitations.
- ❌ Forgetting shade and heat checks — ✅ Solution: add a portable shade sail or schedule active games for cooler parts of the day.
- ❌ Neglecting accessibility — ✅ Solution: apply ADA guidance and offer alternate ways to participate (sound cues, adapted tools).
How can staff and families sustain a small natural outdoor program?
Practical actions to build momentum (numbered):
- 🧑🏫 Short, practical staff training: 15–30 minute refreshers on hazard scans, setting two daily invitations, and how to scaffold loose-parts play. ChildCareEd courses like CDA: Creating the Outdoor Classroom Buy Now $16.00 offer structured modules.
- 📣 Family engagement: share what you’re planting, post a weekly photo and one learning moment, and offer a gear-lending shelf for boots or rain suits.
- 🔁 Simple rotation calendar: Week 1 = water + loose parts; Week 2 = mud kitchen + plant care; Week 3 = balance + art. Rotations keep curiosity alive.
- 🤝 Community partnerships: invite a master gardener, scout troop, or parent volunteer to build a planter or bug hotel (projects are often low-cost and high-ownership—see community examples at WPNR).
- ✅ Measure success: use quick indicators—time children choose to play outdoors, number of child-led projects, and family comments—to iterate monthly.
FAQ (short):
- Q: What if we have no soil? A: Use raised mobile planters or containers—small gardens work in pots (planter ideas).
- Q: How to store loose parts? A: Use stackable bins, crate tops, or a small outdoor shed; label and rotate weekly.
- Q: Can infants be included? A: Yes — provide sensory trays, shaded tummy-time mats, and supervised nature walks; follow ratios and safety guidance.
- Q: Who sets safety limits? A: The program director with staff input, guided by licensing rules and national guidance (CDC and CFOC). State requirements vary - check your state licensing agency.
Conclusion
Small outdoor spaces are not a barrier but an invitation—to be creative, resourceful, and responsive. By applying micro-zoning, prioritizing #naturalplay and #looseparts, and committing to simple safety routines, providers can turn a few square feet into an active, sensory-rich learning environment. Start by choosing one micro-zone and one rotating invitation; document what children do and tweak. Leverage free or low-cost resources: ChildCareEd’s articles and trainings (creative nature classroom, online course Buy Now $16.00), community volunteers, and thrift-store finds. The result: children who move more, imagine more, and connect more closely to the natural world—even in the smallest playground.
- Beautiful Junk: Using Recycled Materials in the Classroom
- Montessori Foundations
- Art from the Heart for Preschoolers: Open Ended Art Projects that Build Self-Esteem
- 45-Hour Infant and Toddler Curriculum
- Sensitive Periods in Montessori: Guiding Natural Learning
- Project-Based Learning for Children
- Texas Director Credential
- CDA: Curriculum Alignment & Materials
- CDA: Creating the Outdoor Classroom
- Free Childcare Training
- How To Prevent Child Injury Using The Course Of 1,2,3 Eyes On Me
- The Family Day Care Chronicles: Tales of Laughter, Learning, and Unexpected Adventures
- CDA Certification en Español: Recursos y Consejos para Educadores Bilingües
- 💛🧩 ¿Cómo puedo hacer que mi enseñanza sea inclusiva para los niños con autismo?
- 🏡🗣️ ¿Cómo hablo con los padres sobre los comportamientos que su hijo aprendió en casa?
- Proporciones de Cuidado Infantil y Tamaños de Grupo por Edad en Virginia (Guía Rápida para Centros y Hogares)
- Celebrando la amistad en el cuidado infantil durante el Día de los Mejores Amigos
- Canciones, juegos y preguntas de círculo para niños
- How Can Michigan Providers Prevent Summer Learning Loss in Young Children?
- How can small playgrounds be transformed into engaging learning environments using natural materials?
- How Can Recycled Materials Create Engaging Learning Centers?
- How Can Loose Parts Play Turn Everyday Objects Into Powerful Learning Opportunities?
- How Can Child Care Providers Create a Positive Classroom Behavior Support Plan Through Curriculum and Play-Based Learning?
- What Can Providers Learn From the Toys Children Choose Repeatedly?
- How Can Providers Rotate Classroom Materials Without Overwhelming Children?
- How Can Child Care Programs Balance Indoor and Outdoor Learning Across the Week?
- How Can Child Care Providers Ensure Every Child Can Participate in Outdoor Play?
