A design activity gives children opportunities to imagine, choose, and create, and each child may need different tools or support to take part. Try the Design Your Own Beach Towel Buy Now $0.25 activity as a starting point, offering ways to select colors and patterns, use accessible art tools, or direct an adult’s help while keeping creative decisions with the child. Let the child’s preferences and individual access needs guide any adaptations. For a broader foundation in cerebral palsy and inclusive classroom practice, explore ChildCareEd’s Intro to Cerebral Palsy  Buy Now $16.00. Read on for practical ways to make the design process accessible and preserve each child’s ownership of their work.
Why does accessibility matter in a design activity?
Design projects give children opportunities to make decisions, test ideas, communicate preferences, and share work with peers. When a child with cerebral palsy cannot reach materials, stabilize paper, or manipulate a tool, the barrier may come from the activity’s setup—not from a lack of interest or creativity. Thoughtful adjustments protect the central learning goal while making participation possible in different ways.
Cerebral palsy affects movement and posture differently from child to child. Some children may have difficulty with grasp, coordination, range of motion, or maintaining a comfortable position; others may use assistive devices or communicate choices in ways beyond speech. Avoid assuming what a child can or cannot do based on diagnosis. Start with the child’s interests and strengths, observe what happens during the task, and ask the family about strategies that work well.
Inclusion is more than being present at the table. A child should have meaningful opportunities to make choices, influence the design, and take part in the group’s creative process. As the inclusive care strategies resource notes, adjustments can change the way a child participates without changing the purpose of the activity.
How can you prepare the space and materials?
Begin by checking the physical environment before children arrive. Place materials within comfortable reach, make clear paths for mobility devices, and ensure the child has stable, supported seating suited to the activity. If positioning or equipment needs are unclear, consult the family and relevant specialists rather than improvising with supports that may be unsafe or uncomfortable.
Organize the design station so that supplies are easy to see and select. Use shallow, non-slip trays or containers, and secure paper with tape, clips, or a non-slip mat when appropriate. A tilted surface or easel may make a drawing or painting task easier to see and reach. Adaptations should be safe, cleanable, age-appropriate, and consistent with the child’s plan and program procedures.
- Offer a variety of tools: thick crayons, broad markers, short or easy-grip brushes, sponges, stampers, or a digital drawing option.
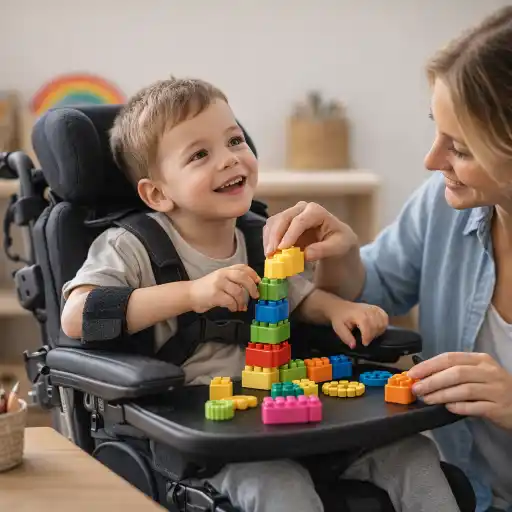
- Choose larger pieces that are easier to grasp and see; supervise closely and avoid small items when choking risk is a concern.
- Present a manageable selection at a time so the workspace stays uncluttered and choices remain clear.
- 🌟 Ask the child which tool or material they would like to try, and honor the response—spoken, gestured, pictured, or communicated with a device.
Small adjustments to the environment can make a large difference. The ChildCareEd Environmental Adaptations Checklist to Promote Child Participation Buy Now $0.00 can also prompt a useful review of access and participation across classroom activities.
How can you adapt the design task without taking over?
Keep the creative idea intact while offering more than one way to carry it out. If the group is designing a garden collage, for example, children might draw, arrange pre-cut shapes, press stamps, direct a partner, or select images for an adult to place according to their instructions. The goal is meaningful authorship: the child’s decisions shape the finished design.
Break the project into brief, visible steps: choose a theme, select materials, make a mark or place an element, then review or add another detail. Demonstrate each step and use photographs, picture cards, or a sample sequence if helpful. Allow extra time and flexible pacing; fatigue, involuntary movement, or the effort of maintaining posture can affect how long an activity feels manageable.
- Offer a choice between two or three options rather than expecting the child to scan a crowded assortment.
- Use adhesive-backed paper, reusable stickers, large pieces, or pre-cut shapes if cutting or grasping is a barrier.
- Stabilize the page and place supplies on the side the child can reach most comfortably, based on their preferences and support plan.
- Offer assistance only as needed. Ask before touching the child or their equipment, and let the child direct any help.
Tools such as a foam grip, a larger handle, or a universal cuff may help some children, but no single adaptation works for everyone. For individualized equipment or positioning guidance, partner with the family and the child’s occupational or physical therapist when appropriate. Educators can draw on practical support strategies for children with special needs while keeping the child’s own preferences at the center.
How can you support choice, communication, and peer participation?
Accessible design includes a way for the child to express ideas throughout the process. Some children communicate through speech; others may use gestures, eye gaze, picture choices, or assistive communication tools. Pause after offering a choice, give time for a response, and treat the child’s communication as meaningful. Do not interpret silence or slower movement as lack of interest.
Plan collaboration so peers contribute without becoming substitutes for the child. A partner can hold a tray steady or pass materials, while the child chooses colors, directs placement, or decides when the design is complete. Rotate roles and explain that people may participate in different ways. This supports belonging without singling out one child or making their participation a public lesson for others.
Use strengths-based language that recognizes process and agency: “You chose the blue pieces,” or “You showed us where the next shape belongs.” Avoid praising only the amount produced or the neatness of the result. If the child becomes tired or frustrated, offer a pause, a different tool, or a way to finish later. Behavior and body language can provide useful information about comfort, effort, and access.
For more focused professional learning, the English-language course Supporting Skill Development: Children with Special Needs Buy Now $24.00 explores accommodations and ways to support children’s functional skills. You can also consider Inclusive Lessons for Preschoolers Buy Now $16.00, which focuses on planning accessible activities for young children.
How can you evaluate and improve the activity?
After the project, reflect on whether the child had genuine control over important decisions and whether the materials, position, and pace supported comfortable participation. Notice what the child chose, what they reached for, how they communicated, when they needed a break, and which parts seemed most engaging. These observations are not a diagnosis; they help educators refine the learning environment and share concrete information with families.
Invite the child to show or tell what they want others to notice in the design. If direct explanation is difficult, offer pictures or simple prompts and allow the child to communicate in their preferred way. Document both the child’s design choices and the supports that made access easier. Use these notes to plan the next activity rather than relying on assumptions or a one-time trial.
- Check that pathways, table height, seating, and materials remain accessible throughout the project.
- Ask the family what worked at home or in other settings, and coordinate with specialists when appropriate and with consent.
- Review any relevant individualized plans, safety procedures, and accessibility obligations with program leadership.
- Remember that state requirements vary - check your state licensing agency.
Providers looking for broader inclusion and accommodation guidance may also find the ChildCareEd course Access for All: Inclusion and the ADA Buy Now $16.00 relevant. Check course details and local requirements to determine whether it fits your professional learning needs.
Conclusion: What makes a design activity accessible?
A design activity is accessible when the child can take part meaningfully, make decisions, and express creativity through tools and methods that work for them. Start by learning the child’s preferences, preparing an accessible workspace, and offering flexible ways to create. Provide time, choice, communication supports, and assistance that follows the child’s lead rather than taking over.
Keep the purpose of the activity—creative exploration and shared participation—while adapting materials, steps, and environment. Reflect afterward, collaborate respectfully with families and specialists, and build on what you observe. Each thoughtful adjustment helps make the classroom a place where a child with cerebral palsy is not merely included in the activity, but recognized as a designer and creator.
Latest Jobs
- 45 Hour Child Growth and Development
- 45 Hour Preschool Methods and Materials
- Moving About the Classroom: Effective Transitions for Everyday
- Intro to Cerebral Palsy
- 45 Hour School Age Methods and Materials
- CDA Bridge Bundle: Family Child Care without Portfolio Review
- CDA Bridge Bundle: Infant/Toddler without Portfolio Review
- CDA Bridge Bundle: Preschool without Portfolio Review
- Texas Director Credential
- CDA Certification en Español: Recursos y Consejos para Educadores Bilingües
- 💛🧩 ¿Cómo puedo hacer que mi enseñanza sea inclusiva para los niños con autismo?
- 👶 ¿Cuáles son las proporciones y grupos requeridos en Dakota del Norte? 🏫
- Cómo Abrir Una Quardería En Casa Sin Dinero?
- Proceso CDA: Entrenamiento, Portafolio, Examen y Visita de Verificació
- ¿Cómo puedo enseñar habilidades de primeros auxilios con escenarios de juego de roles?
- 10 Ejemplos de Cómo la Cultura Influye en el Desarrollo Infantil
- Capacitación en Salud y Seguridad Preventiva en Línea para Proveedores de Cuidado Infantil
- Cómo Empezar una Guardería en Casa: Requisitos y Pasos
- Proporciones de Cuidado Infantil y Tamaños de Grupo por Edad en Maryland (Guía Rápida para Centros y Hogares)
- Proporciones de Cuidado Infantil y Tamaños de Grupo por Edad en Nueva Jersey (Guía Rápida para Centros y Hogares)
- Proporciones de Cuidado Infantil y Tamaños de Grupo por Edad en Virginia (Guía Rápida para Centros y Hogares)
- Apoyo en Preescolar para Retrasos del Habla: Estrategias Simples que Ayudan
- Capacitación Previa al Servicio para Proveedores de Cuidado Infantil en Dakota del Norte
- Capacitación CDA gratuita en Illinois
- Celebrando la amistad en el cuidado infantil durante el Día de los Mejores Amigos
- Diversión fresca de verano: actividades del Día Nacional del Helado para niños
- Canciones, juegos y preguntas de círculo para niños
- Cómo simplificar la capacitación para sus empleados de daycare
- How Can You Make a Design Activity Accessible to a Child with Cerebral Palsy?
